Chronolator For Word
The Chronolator Browser Tools work with chronologies produced by Chronolator for Word.
However, the Browser tools and Chronolator for Word use different types of file. This section describes how to transfer chronologies between them.
Transfer from Word to Chronolator Data Entry
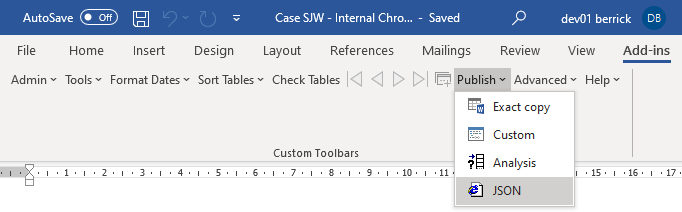
On the Chronolator toolbar, press Publish > JSON to produce a file in JSON format:
Note that the JSON file is unencrypted and readable by humans with a simple text editor. If you want to prevent this, open it in one of the Chronolator Browser Tools and save it: this will produce a txt file that only the browser tools can interpret.
If you want to further protect the chronology with a password, follow the instructions in Overview of Common Tasks.
Transfer from Chronolator Data Entry to Word (or Excel or other program)
There are two ways to transfer data from the Chronolator Browser Tools to Word:
- the Chronolator Conversion Tool
- via the Clipboard
Use the Conversion Tool if you want to use Chronolator for Word features. If you only want to produce a plain Word document, you can use the Clipboard.
Using the Conversion Tool
The conversion tool works on a JSON file. To make one, press the Save As JSON button on the Finish tab.
If you already have a Chronolator for Word licence, you will find the Conversion Tool in the ChronologySetup folder.
If you do not, you can download it from www.chronolator.com/downloads/download-conversion-tool.htm.
In either case, the aforementioned Web page includes instructions about how to use it.
Using the Clipboard
Step 1 - copy the chronology to the Clipboard
The first step in transferring from the Tools is to copy the chronology to the system Clipboard.
You can do this in two ways:
- press the Copy button above the chronology table
- press the Copy to Clipboard button on the Finish tab
Step 2 - paste the Clipboard to another program
You can paste the clipboard into another application such as Microsoft Word or Excel (or, indeed, any other).
- You can paste the clipboard by using the Paste button on the Home tab, or by pressing Ctrl+V.
The following instructions assume you are pasting into a new, blank Microsoft Office document.
After pasting
Excel should automatically convert the data when you paste it into a blank spreadsheet.
After pasting into Word, you will need to convert the text to a table like this:
- Select All (Ctrl+A)
- Convert the selection to a table using the Insert tab, choosing Table > Convert text to table and using all the defaults
Line breaks: Word and Excel
If your table contained line breaks, they will have been transformed into the ` character .
Do the following to change them back into line breaks:
- Select All (Ctrl+A)
- Open the Replace dialog (Ctrl+H)
- Type ` in the Find What box. You should find it at the top left of your keyboard
- (In Word): Type ^p in the Replace with box. You should find the ^ character with Shift+6.
- (In Excel): Type Ctrl+Shift+J in the Replace with box
- Press Replace All